
選択できるのは25トピックまでです。
トピックは、先頭が英数字で、英数字とダッシュ('-')を使用した35文字以内のものにしてください。
 Matthew Piercey
ac8083588b
Add config for Wanhao Duplicator i3 v2.1
Matthew Piercey
ac8083588b
Add config for Wanhao Duplicator i3 v2.1
|
5年前 | |
|---|---|---|
| .. | ||
| Configuration.h | 5年前 | |
| README.md | 5年前 | |
README.md
README.md
These are example configurations for the low-cost Acrylic Prusa I3 pro B 3D Printer DIY kit and the 3DTouch auto bed leveling sensor based on:
The main characteristics of these configurations are:
- The defined motherboard is
BOARD_GT2560_REV_A_PLUS. - Travel limits are adjusted to the printer bed size and position.
- An example
SKEW_CORRECTIONfor a particular printer is enabled. See comments below about how to adjust it to a particular printer. - Using the LCD controller for bed leveling is enabled.
PROBE_MANUALLYis enabled, which provides a means to do “Auto” Bed Leveling without a probe.- The
LEVEL_BED_CORNERSoption for manual bed adjustment is enabled. - Bilinear bed leveling is enabled, the boundaries for probing are adjusted to the glass size, and extrapolation is enabled.
PRINTCOUNTERis enabled, in order to track statistical data.INDIVIDUAL_AXIS_HOMING_MENUis enabled, which adds individual axis homing items (Home X, Home Y, and Home Z) to the LCD menu.- The speaker is enabled for the UI feedback.
bltouchvariant:USE_ZMAX_PLUGis enabled. See comments about connections below.- Heaters and fans are turned off when probing.
- Multiple probing is set to 3.
First-time configuration
Skew factor
The skew factor must be adjusted for each printer:
- First, uncomment
#define XY_SKEW_FACTOR 0.0, compile and upload the firmware. - Then, print YACS (Yet Another Calibration Square). Hint, scale it considering a margin for brim (if used). The larger, the better to make error measurements.
- Measure the printed part according to the comments in the example configuration file, and set
XY_DIAG_AC,XY_DIAG_BDandY_SIDE_AD. - Last, comment
#define XY_SKEW_FACTOR 0.0again, compile and upload.
3DTouch auto leveling sensor
- Print a suitable mount to attach the sensor to the printer. The example configuration file is adjusted to http://www.geeetech.com/wiki/images/6/61/3DTouch_auto_leveling_sensor-1.zip
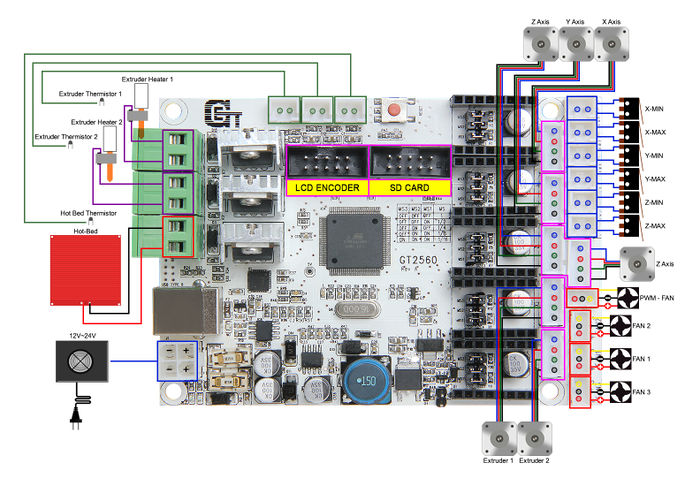
- Unlike suggested in geeetech.com/wiki/index.php/3DTouch_Auto_Leveling_Sensor, the existing end stop switch is expected to be kept connected to Z_MIN. So, the sensor is to be connected to Z_MAX, according to Marlin’s default settings. Furthermore, GT2560-A+ provides a connector for the servo next to thermistor connectors (see GT2560 and GT2560-A+).
- Be careful to respect the polarity of the sensor when connecting it to the GT2560-A+. Unlike end stops, reversing the connection will prevent the sensor from working properly.
- Test and calibrate the sensor.
- If using the GT2560-A+ and with the sensor connected to Z_MAX and an endstop connected to Z_MIN use the following calibration routine instead.
3DTouch Calibration with Z_MAX
- Home the printer with
G28command. - Disable the Z axis software endstop with
M211 S0 Z0 - Reset the probe Z_OFFSET with
M851 Z0 - Move to the center of the bed with
G1 X100 Y100 - Move Z incrementally until the nozzle is the correct height from the bed using a shim or piece of paper, record this Z movement, for example -0.2.
- Do a single probe at the current point in the middle of the bed using
G30and not the returned value, for example 1.9. Invert this value, i.e. -1.9, and add it to the Z offset above, i.e. -0.2 in this example giving -2.1. - Update the probe Z_OFFSET to this value using
M851i.e.M851 Z-2.1. - Re-enable software end-stops with
M211 S1 Z0 - Save this value to the EEPROM with
M500. - Update the start G-Code in your slicer software to insert a
G29after the lastG28. - Carefully test that the offset is correct in the first print.